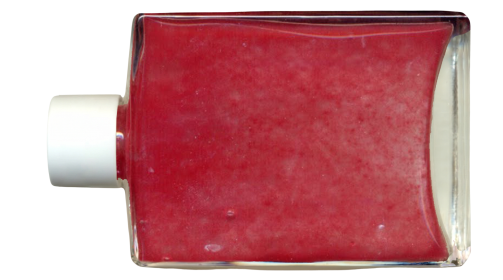
Our Products
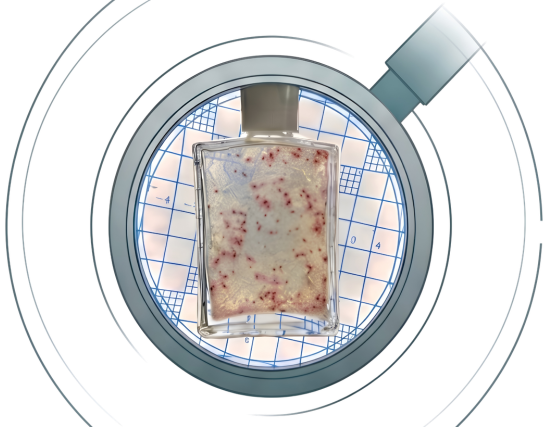
LiquiFind 2
Fast results (visual color change) No specialized equipment required Easy to use - add, shake, observe Suitable for on•site testing
-
LiquiFund 2 offers accurate and fully quantitative detection of microbial contamination in fuels, lubricants, and associated water systems.
-
Compliant with ASTM D7978 and IP 613, making it suitable for both field and laboratory use, enabling early identification of microbial growth.
-
Provides a total count of microbial CFU (Colony Forming Unit). CFU is the conventional unit of measurement for microbial contamination used in a wide range of industries.
-
LiquiFund 2 detects important bacteria, yeasts, and moulds that can contaminate petroleum products, including:
-
H. Res
-
Aspergillus
-
Candida
-
Pseudomonas
-
LiquiFind 2 allows early detection of microbial growth, enabling preventive maintenance and corrective treatment before serious damage occurs. Suitable Fuel Types Diesel Aviation fuel (Jet A / Jet A-I) Kerosene, Furnace oil, Biodiesel and biodiesel blends Marine ftels Metal v.'orking fluids, plant process waters, Die casting fluids, cleaners, cosmetics, liquid soaps and detergents, etc. LiquiFind 2 consists of a screw'•capped bottle containing a thixotropic nutrient gel. A sample is added to the gel using a sterile plastic loop or syringe (provided). The bottle is shaken and the gel liquefies and the sample, and any microorganisms in it are dispersed. The gel is re-set into a flat layer and the bottle is incubated in the dark. The gel contains components which sustain the growth of viable microorganisms and the sample itself contributes additional nutrients. Viable microorganisms in the sample grow into visible spots known as "colonies", and a reactive compound changes the colour of these colonies to red or purple so that they can be easily seen. The number of colonies formed is a direct estimate of the number ofviable microbial particles (CFU) present in the sample.
Collect the fuel sample in a clean and dry container, ensuring that free from debris and prevents introduction of background contamination into the sample. Once fuel samples have been taken, any microbes present will tend to slowly die and it is important to test samples as soon as possible. If test is carried out more than 24 h atter sampling it is possible that the resulß will not reflect the viable microbial content present at the time Of sampling TO avoid this, part or all Of the LiquiFind 2 test procedure can be conducted at the sampling location.
If the LiquiFind 2 test bottles have been stored refrigerated, allow them to equilibrate to ambient temperature before they are used. Remove the seal from the cap Of the bottle before using each LiquiFind 2 test. Avoid prolonged exposure Of the LiquiFind 2 test bottles to direct sunlight or other bright light during preparation, incubation and examination of tests. Cleanliness during testing LiquiFind 2 tests can be conducted on-site, in an Office or in a laboratory. However, precautions should be taken to ensure testing is conducted in a reasonably clean area to avoid contamination of the sample and the test by microorganisms other than those in the test sample. Wash hands before and after testing. During testing wear clean, nitrile, vinyl or polythene gloves. Avoid touching areas of the syringe and loop dispenser which come into direct contact with the sample and avoid touching the inside of the LiquiFind 2 test bottle cap and neck when dispensing sample.
1. Aviation kerosene, other middle distillate fuels and gasoline.
Immediately prior to testing, shake the sample for 30 seconds. If fuel samples contain visible free water the sample should be allowed to stand for 12 minutes to enable water to settle from the sample to be tested. For consistency, it may be advisable to apply this settling time for all fuel samples even if free water is not observed.
Using the syringe, draw fuel from approximately 3 cm below the surface of the sample. If there is less than 6 cm depth of fuel phase, draw sample from approximately halfway down the fuel phase. Avoid the transfer of visible interfacial particulate, water droplets or emulsion in the aliquot to be tested. Insert the tip of the syringe into the neck of the LiquiFind 2 test bottle and dispense the sample by fully depressing the syringe plunger.
Replace the cap on the LiquiFind 2 bottle and tighten. Proceed for Step B.
2. Heavy and residual fuels and oils.
Immediately prior to testing, shake the sample for 30 seconds. Remove the cap of the LiquiFind 2 test bottle and place it on a clean surface. Immerse the loop end into the fuel/oil to approximately 3 cm below the surface of the sample or, if there is less than 6 cm depth of fuel/oil phase, to halfway down the fuel/oil phase. Remove the loop from the sample and allow surplus fuel/oil to drain off; ensure a film of fuel/oil is trapped within the loop.
Insert the loop into the neck of the LiquiFind 2 test bottle and stab it into the gel and agitate it briefly to transfer the sample. Replace the cap on the LiquiFind 2 bottle and tighten. Proceed for Step B.
3. Water phase associated with fuel / oil.
If a test of water phase is required, allow the sample to stand until free water has settled to the bottom of the sample. It is recommended the water phase test is conducted after any fuel/oil phase test. The test procedure is essentially the same as described above but an appropriate technique for separating/removing water from the sample needs to be used.
As appropriate for the volume of sample being tested use the loop dispenser or syringe to measure the required volume of water.
1.To Test 0.1 ml Of Water Using The Syringe:
The water phase can be drawn directly from the bottom Of the sample and added to the LiquiFind 2 test bottle. TO enable easy access to the water it may be necessary to first decant off some fuel from the sample and/or transfer the water phase to a separate small, sterile container using a syringe or a long sterile pipette (supplied separately). Mix gently by swirling but avoid mmng the fuel and water layers together. Open the peel pack containing a syringe at the handle end and remove the syringe taking care not to touch the lower barrel and nozzle. Insert the barrel Of the syringe into the sample so that the nozzle is in the water phase. Draw waterintcthe syringe, remove from the sample and then, with the syringe nozzle uppermost, expel air. Expel surplus water until the end of the plunger aligns with the 0.1 ml mark. Insert the tip of the syringe into the neck of the LiquiFind 2 test bottle and dispense the sample by fully depressing the syringe plunger Replace the cap on the LiquiFind 2 bottle and tighten Record the sample details and test date on the label provided and stick it on a narrow side of the bottle. Proceed to Step B.
2.To Test 0.01 ml Of Water Using The Loop Dispenser;
BIOTECH PVT. LTD. A syringe can be used to draw water from the bottom Of the sample and then a drop Of water placed into the loop and added to the LiquiFind 2 test bottle. Alternatively, transfer the water phase to a separate small, sterile container using a syringe or a long sterile pipette (supplied separately). Avoid transfer of fueL Invert the container with the separated water three times to mix. Remove the cap of the LiquiFind 2 test bottle and place it on a clean surface. Open the peel pack containing a loop dispenser and remove it taking Care not to touch the loop end and the lower part of the handle. Immerse the loop end into the separated water or fill the loop With a drop Of water using a syringe. Allow surplus water to drain away but ensure the circle Of the loop remains filled with water; note, if a reside of fuel is present this can impair the ability of the loop to fill with water Insert the loop into the neck of the LiquiFind 2 test bottle and stab it into the gel and agitate it briefly to transfer the sample. Replace the cap on the LiquiFind 2 bottle and tighten. Record the sample details and test date on the label provided and stick it on a narrow side of the bottle. Proceed to Step B.
3.Shake to disperse sample in the LiquiFind 2 gel
Loosen and break up the gel in the LiquiFind 2 bottle containing the dispensed sample, by tapping the bottle firmly in the palm Of your hand or on a rubber bung Shake the bottle vigorously for approximately 30 seconds to lique& the gel and disperse the sample. The test bottle can be tapped repeatedly for 30 seconds with shaking. After shaking, the gel should be slightly viscous but free of lumps and have a uniform consistency and clarity The presence Of bubbles in the gel is normal and Will not affect the test. Tap the bottle in the palm of the hand until the gel forms a nat layer on one of the larger nat sides. Ensure that a uniform layer reaching all corners is obtained.
1. Incubation
Transfer the test bottle to a warm, dark location or incubator to maintain a nominal temperature of 25°C ± 3°C / 77°F ± 5.4°F. In normal circumstances the gel should be incubated for 4 days. Avoid exposure to light during incubation. The gel will set firmly after a few hours. Keep the gel on the lower surface of the bottle and avoid excessive agitation or prolonged tilting of the bottle during incubation, examination and any transportation.
2. Examination
If possible examine the test daily during incubation. As a minimum, examine it on at least one occasion in the first 3 days and again on the final day of incubation. To examine the test, hold it against a light background and count the number of all visible purple/red. A hand magnifying lens may help you to identify and count small colonies. All purple colonies in all parts of the test bottle should be counted, including any which are in gel which is not part of the flat layer. Once a colony is counted do not count it again even if it grows larger; it is the number of colonies that is important, not their size. It is recommended that colonies are marked with a marker pen on the bottle to ensure that they are not counted twice. Ignore any air bubbles which may form in the gel.
It is usually possible to count up to about 250 colonies. If the number of colonies is too numerous to count, visually compare the test to the Test Results Chart holding the test against a white background. The chart provides an estimate of the colony count.
3. Calculation of the CFU in the sample
Results of test of fuel phase sample:
If 0.5 ml of fuel has been tested, multiply the number of colonies counted or estimated by 2000 to give the number of microbial CFU per litre of fuel. If there are no colonies after the specified incubation time there are less than 2000 microbial CFU per litre of fuel. If 0.25 ml of fuel has been tested, multiply the number of colonies counted or estimated by 4000 to give the number of microbial CFU per litre of fuel. If there are no colonies after the specified incubation time there are less than 4000 microbial CFU per litre of fuel.
LiquiFind™ 2 Test Results Chart
Compare incubated test bottle appearance with sample volume tested to determine microbial contamination level.
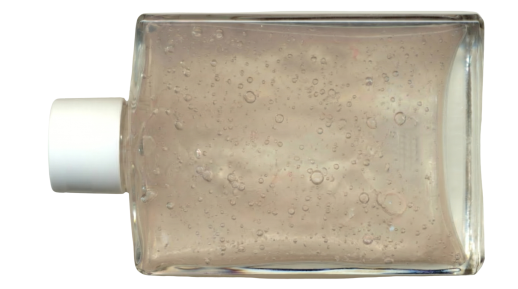
None
Zero Colonies Detected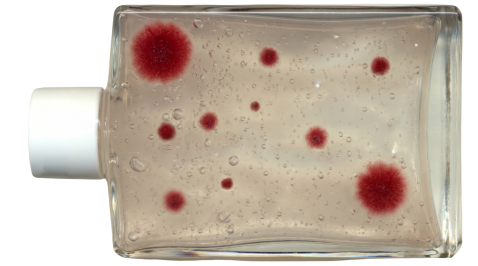
10 COLONIES
If possible, count exact number of colonies and calculate actual CFU.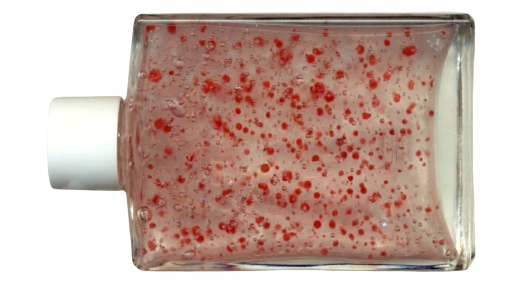
100 COLONIES
Count exact colonies or estimate 100 colonies if result matches picture.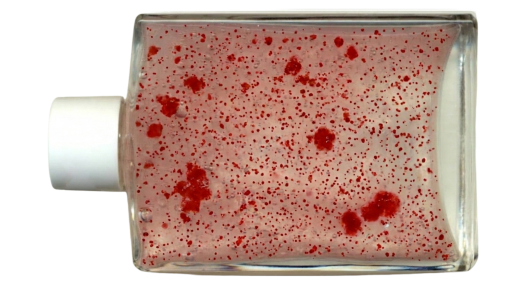
ESTIMATE 1000 COLONIES
Estimate 1000 colonies if result is similar to picture.